
Audi A6 TFSI knock sensor replacement
Audi A6 firing order
Tfsi Firing order: 1-5-4-8-6-3-7-2
Audi A6 TFSI engine :
Removing and installing knock sensors :
⇒ Removing and installing knock sensor – G61- (cylinder bank 1, right-side) – A6 only
⇒ Removing and installing knock sensor G61 (cylinder bank 1, right-side) – A7 only
⇒ Removing and installing knock sensor 2 G66 (cylinder bank 1, right-side)
⇒ Removing and installing knock sensor 3 G198 (cylinder bank 2, left-side)
⇒ Removing and installing knock sensor 4 G199 (cylinder bank 2, left-side)
⇒ Removing and installing knock sensor – G61- (cylinder bank 1, right-side) – A6 only


– Disconnect earth wire at battery with ignition switched off.
– Remove bolts -arrows- and detach air duct -2-.
– Release catches -arrows A- and detach air duct -1- on left and
right -arrow B-.
– Release retaining pins for radiator on both sides and pull out
upwards -arrows-.
– Push radiator towards the front.
– Remove tensioner for poly V-belt ⇒ Rep. gr. 13 .
– Unplug electrical connector -3-.
– Remove nut -1- and detach B+ wire -2-.
– Unscrew bolts -arrows- for alternator approx. 6 turns.
– Tap carefully on bolt heads with a hammer to release sliding
bushes of alternator mountings.
– Remove bolts completely.
– If fitted, remove silencer for auxiliary heater ⇒ Rep. gr. 82 .
– Move alternator as far as possible to the right.
– Loosen bolts and detach coolant hoses -2 and 4- with con‐
nections.
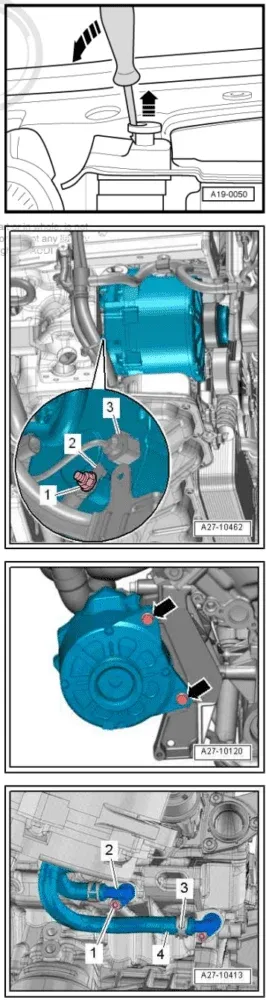
– Unplug electrical connector -1-.
– Unscrew bolt -2- and remove knock sensor 1 -G61- .
Installing
Installation is carried out in the reverse order.
⇒ Removing and installing knock sensor G61 (cylinder bank 1, right-side) – A7 only
Removing
– Disconnect earth wire at battery with ignition switched off.
– Remove alternator
– Unplug electrical connector -1-.
– Unscrew bolt -2- and remove knock sensor 1 -G61- .
Installing
Installation is carried out in the reverse order.
⇒ Removing and installing knock sensor 2 G66 (cylinder bank 1, right-side)

Removing
– Remove front wheel (right-side) ⇒ Wheels and tyres
– Remove cover -1- for drive shaft in wheel housing (right-side).
– Remove engine mounting (right-side)
– Remove nut -2- and move earth wire clear.
– Remove bolts -arrows- and detach engine support -1- (rightside).
– Unplug electrical connector -4- from starter (push retainer to
rear and press down release catch).
– Unfasten nut -3- and detach battery positive wire from solenoid switch.
– Unplug electrical connector -1-.
– Unscrew bolt -2- and remove knock sensor 2 -G66- .
Installing
Installation is carried out in the reverse order.
⇒ Removing and installing knock sensor 3 G198 (cylinder bank 2, left-side)
Removing
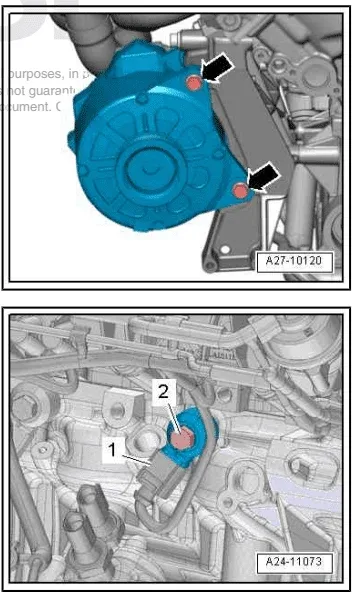
– Remove air conditioner compressor ⇒ Air conditioning system
– Detach electrical connector -2- from bracket and unplug.
– Unscrew bolt -1- and remove knock sensor 3 -G198- .
Installing
Installation is carried out in the reverse order
⇒ Removing and installing knock sensor 4 G199 (cylinder bank 2, left-side)
Removing
– Remove electromechanical steering rack ⇒ Running gear, front-wheel drive and four-wheel drive;
– Unplug electrical connector -arrow-.
– Remove bolt -2-.
– Detach knock sensor 4 -G199- and unplug electrical connector -1-.
Installing
Installation is carried out in the reverse order.
HOME