
How to test Alternator
Testing the alternator is an essential part of diagnosing potential electrical issues in a vehicle. Here’s a step-by-step guide on how to test the alternator:
Tools and Materials Needed:
- Multimeter
- Safety gloves and goggles
Procedure:
- Safety First:
- Ensure the vehicle is parked on a flat surface, the engine is turned off, and the key is removed.
- Put on safety gloves and goggles to protect yourself during the testing process.
- Visual Inspection:
- Visually inspect the alternator for any signs of damage, loose connections, or frayed wires.
- Battery Voltage Check:
- Measure the battery voltage with a multimeter. This will give you a baseline reading.
- Connect the red multimeter probe to the positive terminal of the battery and the black probe to the negative terminal.
- Start the Engine:
- Start the engine and let it idle.
- Check Battery Voltage While Running:
- With the engine running, check the battery voltage again.
- A healthy charging system should show a voltage reading between approximately 13.5 to 14.5 volts. This indicates that the alternator is charging the battery.
- Load Test:
- Turn on electrical components like headlights, air conditioning, and other accessories.
- Monitor the voltage again. It should remain within the acceptable range.
- If the voltage drops significantly below 13 volts, there may be an issue with the alternator.
- Check for Unusual Noises:
- Listen for any unusual noises coming from the alternator, such as grinding or whining. These noises could indicate a problem.
- Belt Inspection:
- Inspect the alternator belt for proper tension and signs of wear. A loose or damaged belt can affect the alternator’s performance.
- Amperage Test (Optional):
- While a multimeter can measure voltage, specialized tools are needed to test the alternator’s amperage output. This may require professional equipment.
- Professional Testing (if needed):
- If you have access to an automotive shop or if the above tests reveal issues, consider taking the vehicle to a professional mechanic or auto parts store for a more comprehensive alternator test.
Remember, these steps provide a general guide for alternator testing, and actual procedures may vary depending on the vehicle make and model. Always refer to the vehicle’s service manual for specific testing procedures and specifications. If you’re not comfortable performing these tests yourself, it’s advisable to seek professional assistance.
Testing your vehicle’s alternator is a relatively simple process and can help you determine whether it is charging your battery correctly. Here’s a step-by-step guide on how to test your alternator:
Safety Precautions: Before you begin, ensure your vehicle is parked in a safe location with the engine off. Keep the vehicle’s transmission in “Park” or “Neutral” and engage the parking brake. Wear appropriate safety gear and avoid working near moving engine parts.
Tools and Equipment Needed:
- A digital multimeter
- Safety goggles and gloves
Procedure:
- Locate the Alternator: The alternator is typically situated at the front of the engine and is connected to the serpentine belt or drive belt. Refer to your vehicle’s service manual to find the exact location of the alternator.
- Check Battery Voltage: Start by checking the voltage of your vehicle’s battery. Use the multimeter to measure the battery voltage. It should read approximately 12.6 volts when the engine is off.
- Start the Engine: Start your vehicle’s engine and let it run at idle. Make sure all electrical accessories (lights, radio, A/C) are turned off.
- Measure Battery Voltage While Running: With the engine running, use the multimeter to measure the voltage at the battery terminals again. It should now read around 13.8 to 14.5 volts. This increase in voltage indicates that the alternator is charging the battery.
- Increase Electrical Load: To further test the alternator, turn on some electrical accessories, such as the headlights and rear window defroster. This will put a higher load on the alternator. The voltage at the battery should remain within the range mentioned earlier, indicating that the alternator can handle increased electrical demand.
- Rev the Engine: While keeping the electrical load on, increase the engine’s RPM by gently revving it to around 2,000 RPM. The voltage should remain stable or slightly increase within the specified range.
- Listen for Unusual Noises: Pay attention to any unusual noises coming from the alternator. If you hear a grinding or whining sound, it may indicate a problem with the alternator’s bearings or internal components.
- Shut Off the Engine: After completing the tests, turn off the engine and remove any electrical load.
Interpreting the Results:
- If the voltage at the battery remains at or near 12.6 volts with the engine running, the alternator may not be charging properly, and you should have it inspected or replaced.
- If the voltage increases to around 13.8 to 14.5 volts with the engine running and remains stable, the alternator is likely functioning correctly.
- Unusual noises or voltage fluctuations outside the specified range could also indicate alternator issues.
If you suspect that your alternator is not working correctly based on these tests, it’s recommended to have a professional mechanic inspect and diagnose the issue to determine whether repair or replacement is necessary.
KTR Alternator check

If the battery discharges when the vehicle is not driven, there may be a constant drain or current draw causing it to discharge when the ignition is off. Depending on the draw and the condition of the battery, a full discharge can happen overnight or it may take a few weeks. Although a small static drain on the battery is normal (for example to operate the clock or radio memory), a large drain such as a relay sticking on or a faulty switch will cause the battery to quickly discharge. Make a static current draw test as the first step when experiencing battery discharge.
If the current draw on the battery is not excessive and the battery still discharges, the condition of the battery should be tested. Battery testing determines the state of the battery charge. The most common methods are open-circuit and load voltage testing. Batteries with filler caps can also be tested by checking the specific gravity of the electrolyte.
Inexpensive specific gravity testers are available at most auto supply stores.
Batterie with anti-flash protection
Open-circuit voltage test
An open-circuit voltage test checks battery voltage by connecting an accurate digital voltmeter to the battery posts after disconnecting the battery ground cable. Before making an open-circuit voltage test on a battery, first load the battery with 15 amps for one minute.
See Table a for open-circuit voltage levels and their corresponding percentages of charge.
Some vehicles are equipped with batteries with a central gas venting system with anti-flash protection. The antiflash protection consists of a small round fiberglass mat with a diameter of approximately 15 mm and a thickness of 2 mm. Its purpose is to vent gasses that form in the battery.
The gasses that form while charging can vent centrally through an opening on the upper side of the battery cover. The anti-flash protection is also installed to prevent ignition of the flammable gasses in the battery.
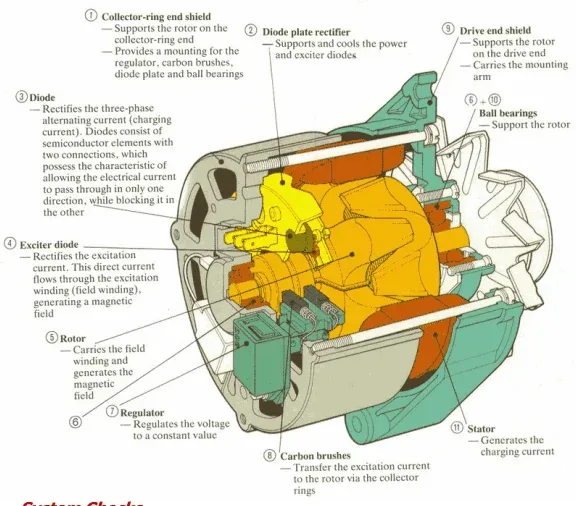
Causes of system failure
Causes of Charging System Failure:
A charging system malfunction is identified by the battery
1. OVERCHARGED BATTERIES caused by one or a combination of the following:
A. Defective Battery.
B. Defective regulator.
C. Poor sensing leads contact to regulator or rectifier assembly.
2. UNDERCHARGED BATTERIES caused by one or a combination of the following:
A. Loose belts; corroded, broken, loose or dirty terminals; broken wiring; undersize wiring;
defective batteries.
B. Alternator field circuit malfunction caused by one or a combination of the following:
a. Poor contacts between regulator and brushes.
b. No residual magnetism in the rotor. (Refer to TSB-1034 to restore residual magnetism.)
c. Defective regulator.
d. Damaged or worn brushes.
e. Damaged or worn slip rings.
f. Poor connection between slip ring assembly and field coil leads.
g. Rotor coil shorted, open, or grounded.
C. Alternator generating section malfunction caused by one of the following:
a. Stator phase(s) shorted, open, or grounded.
b. Rectifier assembly grounded.
c. Rectifier(s) shorted or open.
Multimeter alternator test HOW TO TEST YOUR ALTERNATOR WITH A MULTIMETER
TEST STEPS:
Start the engine
Select DC Volts mode on your multimeter
Clamp the black lead to the negative battery terminal. Clamp the red lead to the positive battery terminal.
the voltage should be between 13.5v and 14.5v
How to test your alternator without a multimeter
Testing your alternator without a multimeter can be a bit more challenging, but it’s still possible to get a general sense of whether it’s functioning properly. Here’s a simplified way to check your alternator without a multimeter:
Warning: This method provides a basic indication of the alternator’s condition and may not be as accurate as using a multimeter.
Procedure:
- Listen for Unusual Noises: Start your vehicle’s engine and listen for any unusual noises coming from the alternator. A whining, grinding, or squealing noise may indicate a problem with the alternator or its components.
- Observe the Battery Warning Light: Pay attention to your vehicle’s dashboard for the battery warning light. When you start the engine, this light should illuminate for a brief moment, and then it should turn off. If the light remains on or comes on while driving, it may be an indication of alternator trouble.
- Turn On Electrical Accessories: Turn on various electrical accessories in your vehicle, such as the headlights, air conditioning, and radio. If the alternator is struggling to charge the battery, you may notice dimming headlights or other electrical issues. However, please note that these symptoms could also be caused by other electrical or battery-related problems.
- Measure Battery Voltage (if possible): If you have access to a voltmeter (even if you don’t have a multimeter), you can use it to measure the battery voltage. With the engine off, the battery voltage should be around 12.6 volts. After starting the engine, the voltage should increase to around 13.8 to 14.5 volts if the alternator is charging properly.
- Drive the Vehicle: Take your vehicle for a short drive. Sometimes, alternator problems become more apparent while driving. Pay attention to any electrical issues, warning lights, or unusual behavior while driving.
Remember that this method provides only a rough assessment of your alternator’s condition. For a more accurate diagnosis, especially if you suspect alternator problems, it’s advisable to have a professional mechanic or technician perform a thorough inspection using specialized tools and equipment. An auto repair shop can provide a comprehensive diagnosis and recommend the necessary repairs or replacements if needed.
- Hybrid cars, electric vehicles, EV and HV.
- Car manuals free download, technical information.
- Free factory auto repair manuals PDF
HOME